Showing posts with label Japanese. Show all posts

Tuesday, September 20, 2011

Meat Wrapped Onigiri

When my friends and I got together for our “Cooking Club”, we made Buta no Kakuni and Korean Sushi (Kimbap) as well as mandoo.  We felt like we needed something else, and I thought that these onigiri I had seen in the Peko Peko cookbook were perfect.  The Peko Peko cookbook was a charity cookbook put together by a bunch of great bloggers and chefs to go towards the Japan relief efforts.  There are seriously some great recipes in here from traditional to modern spins on Japanese classics. 

099  

Meat Wrapped Onigiri
from PekoPeko cookbook

2 cups sushi rice
1/4 cup toasted sesame seeds
1/2 lb. sukiyaki meat
12 shiso leaves
1/4 cup soy sauce
2 Tbsp. mirin
2 Tbsp. sugar
2 Tbsp. sake
2 tsp. grated ginger juice
2 tsp. sesame seed oil

1.  Cook rice in rice cooker or stove top.  Once rice is cooked, preheat the oven to 350 degrees.  Line a baking sheet with foil.   

2.  Use a mortar and pestle and grind the toasted sesame seeds.  Mix the seeds into the hot cooked rice. 

3.  Using firm pressure, create 12 onigiri.  *If you do not use firm pressure the rice balls will fall apart when you bite into them.  Wet and salt your hands to prevent rice from sticking all over. *

4.  In a microwavable container, mix together the soy sauce, sugar, mirin and sake.  Heat in the microwave for one minute and stir in the ginger juice and sesame seed oil. 

5.  Using half of the mixture marinate the sukiyaki meat for 5 minutes.  Pick up the slices and wipe off the extra marinade.  Wrap two slices of the meat around the onigiri, covering it completely.  Repeat for the remaining rice balls. 

6.  Place the wrapped rice balls on the baking sheet.  Bake on the center rack for 10-12 minutes, brushing the rice balls twice with the remaining marinade.  When the meat is browned, remove from the oven and cover each ball with a shiso leaf. 

These are totally yummy and would be perfect in any bento lunch!  I am definitely going to make these again and next time I might stick an ume in the middle for a nice bit of saltiness.  We ate these all up, there were no left overs in sight! 

On another note, I am totally enjoying my photo class.  I feel like I have learned so much with only two classes so far.  I’m seeing small changes in my photos and all the concepts that I learned so long ago in high school are coming back to me!  Here are two of my favorite photos that I have taken since I’ve started my class.    

074

058

Sunday, September 18, 2011

N/Naka

Here is the first official post for my restaurant review section.  Previously I had shared meals from the places I traveled, but after thinking about it I decided to share what Los Angeles had to offer as well.  The other week I went out to a fancy Japanese dinner near my house.  N/Naka is devoted to picking the freshest in season ingredients and creating a 10 course kaiseki menu.  Kaiseki is a traditional multicourse Japanese dinner which show off a variety of cooking techniques as well as the cooks artistry.  The restaurant itself is a small intimate modern space that probably only seats about 25 people.  It seemed like everyone there was on a “hot date” or celebrating a special occasion. 

We lucked out and got a reservation at the last minute, but if you want to check this place out I highly recommend calling ahead of time!  There are three menus available at n/naka, the Chefs Tasting Menu, the Modern Kaiseki and the Vegetarian Tasting.  We went with the Chef’s Tasting along with the wine pairing.  The Chef’s Tasting is a 10 course meal, the staff is amazing and walks you through each course and how each wine selection complements each dish.  Here were some of my favorites!   

Naka

A spring roll with chives, below it was some eggplant and other goodies nestled in a bed of pumpkin sorbet.  So good, one of my favorite dishes of the entire night!  Can I get 3 more of these please?? 

Naka2

We were told that the fish on the right was extremely rare and only in season for 3 months, unfortunately the name skips my mind.  Aji?  But it was paired with watermelon and a balsamic soy reduction and on the left was a delish croquette with micro greens and a ponzu reduction. 

Naka3

This was like a super high class modern poke/sashimi dish.  It was smoked bonito (I’ve never had it raw or fresh before!!) with garlic chips. Maui onions and balsamic reduction.  This melted in my mouth.  So flavorful!!

Naka6

This was the traditional sashimi that countered the one above.  The quality of the fish was so good and it was so fresh, types of fish that I have never tried before were included in there and they all melted like butter in my mouth.  Can you spot the eyeball from the shrimp?? 

Naka4

Seriously- this dish was so sexy!!  You might think it’s weird to say that about a pasta- but if you had this you would understand.  Japanese know how to do pasta!!  This was Abalone with a cod roe pasta, with some abalone liver and truffle sauce. 

Naka7

This was our meat course which was a Wagyu beef, the table next to us got the Modern Kaiseki menu and they actually got hot rocks on which they cooked their pieces of meat. 

Naka8

Love love Japanese desserts!  Some fresh fruits, a mochi like cake and a sesame custard with blueberries.  So delicate and refined! 

I love this place, while it is pricey it is definitely a treat to go to and I would love to go back there to celebrate a special occasion.  We had some great white wine and sake pairings as well.  The waiter was hilarious and told us that he was about to serve us the SEXIEST sake we would ever have!  It was true, it was so smooth and went down so nicely.  If you are in Los Angeles, I highly recommend this place!  Go check it out.   

Friday, September 9, 2011

Buta no Kakuni, Japanese Braised Pork Belly

You know how you know that you are getting older?  When the only time you “drop it like it’s hot” is when you are doing jump squats when working out.  And the only “grinding” that you are doing is coffee beans in the morning.  Ok maybe those are extreme examples, but recently a couple of my friends and I started our Sunday Cooking club as a way for us to hang out (goodbye clubbing and bar hopping days?)  Each month we are going to pick a theme and each person is going to bring a dish/ingredients in.  Our first theme as Asian Cuisine! 

In recent years pork belly has appeared in almost every restaurant, but long before it became the appetizer du jour, it has been a staple in Asian cuisine.  This is one of the Japanese classic recipes that I made recently when my friends and I all got together.  My friend MC taught us all how to make Buta no Kakuni!   While this dish takes a while to make, it is definitely worth the wait.   The pork falls apart in your mouth and it sooo good!  Oh and she just started her own blog too!  It’s Slow Carb focused, check it out here!

103

Buta no Kakuni
from MC

1 lb pork belly (choose a piece with the skin still on if possible)
2 Tbsp sugar
1 large Tokyo green onion, cut into 6 inch pieces
1 large piece ginger
3 Tbsp soy sauce
2 Tbsp cooking sake
2 cups water
4 medium boiled eggs *optional
daikon *optional

1,  Cut the pork into large cubes.  Turn the burner on medium-high and using a heavy bottom pot to brown the pork.  Brown the pork on all sides.  *No need to put oil in the pan, start with the fat side down.*

060

2.  Once pork is browned, push the pork to the outer edges of the pan and add sugar to the fat in the middle of the pan and stir until caramelized. Coat pork with this substance.

3.  Add all other ingredients to the pan and bring to a boil, then lower heat and let simmer.  Cover and let cook for 3 hours. 

064067
Optional:  During the last hour you can add large peeled pieces of daikon to the pan.  And a couple minutes before serving you can add the medium boiled eggs to the pan, allowing the eggs to soak up some sauce. *Careful not to let it soak too long or the egg will cook all the way through.*

100

So yummy this just melted in our mouths!  I need to make this again soon!!  The Korean Sushi was also a part of our feast that Sunday and I have one more dish that I will share with you as well!  Up for next time is a Crab Boil! 

104

Monday, August 29, 2011

Tofu with Ricotta Cheese

Life is about the unexpected combinations that make you smile.  This happens in food, music and probably even romantic relationships.  What would life be like without combos like:  Bacon + Chocolate, Mozzarella + Kim Chee Fried Rice (amaaaaaaaa-zing), Michael McDonald + Grizzly Bear (While You Wait for Others), The Black Keys and Mos Def (Ain’t Nothing Like You), the list goes on…  I have had my eye on this recipe for a while, I was a little scared to try it because of the unexpected combo, but now its one of my favorites!  You can make it in less than 10 minutes, its super healthy and it’s delish.  The flavor and ingredient combo might scare you at first, but please try it, you won’t be sorry! 

tofu

When I made this I didn’t have shiso leaves, but I did have mint and basil.  In a lot of Japanese recipes I always see them claiming that you can substitute shiso for a mix of mint and basil.  I am here to tell you it is so true!!! 

Tofu with Ricotta Cheese
adapted from Harumi’s Japanese Home Cooking

1 block soft silken tofu
1/4 cup soy sauce
2 tsp. sugar
1 Tbsp. mirin
1/2 tsp. grated ginger
1/2 cup fat free ricotta cheese
5 shiso leaves, or a mix of mint and basil
sesame seeds or furikake

1.  Remove the chilled tofu it’s package and drain.  Place on a serving dish.

2.  In a small microwave safe dish mix soy sauce, sugar and mirin.  Place in the microwave for 2-3 minutes.  Let it cool and add in the grated ginger. 

3.  Place the ricotta cheese on top of the tofu, sprinkle with shredded shiso leaves and furikake/sesame seeds.  Pour sauce over the tofu and serve. 

This dish is so good!  It’s nice and refreshing for the last few warm days of summer that we have.  Its great with a side of soba or over some fresh greens!  This could be your next favorite unexpected combination!

Monday, April 25, 2011

Omurice (Ketchup Rice)

At the high school I went to in Hawaii, most people brought home lunch.  I'm not really sure why, in fact I don't think I ever ate a hot lunch from the Cafeteria during my entire stay there.  (Though I did eat a lot of pizza and chicken fingers from the Snack Bar...)  My best friend always had the best lunches.  Her mom had moved to Hawaii from Japan and so every day my best friend and her brother had the best bento lunches!  I always looked over in envy and wanted to switch my turkey sandwich and chips for her lunch.  My best friend must have told her mom, since every once in a while she would pack a bento for me too! 

omurice13
One of my best friends favorites, that I often stole a bite of, was Ketchup rice, or Omurice.  This dish is basically a spin on fried rice and combines it in an omelet.  According to Wikipedia, the traditional Omurice is made with a chicken ketchup rice, but this recipe is the way I remember my best friends mom making it. 
Ketchup Rice
from my best friends mom

2 cups day old rice
1/2 onion, diced
1/2 green bell pepper, diced
1 Tbsp. olive oil
2 Tbsp. ketchup
6 slices Canadian bacon/bacon/ham (approximately 100g)
salt
pepper
Tabasco (optional)
4 eggs
1 tbsp. milk

1.  Dice the onion, green bell pepper and Canadian bacon into even sized pieces. 
Omurice

2.  Heat skillet and pour 1 Tbsp. olive oil into pan.  Cook the Canadian bacon, onion and green bell pepper until onion and bell pepper soften.  Season with salt and pepper. 
Omurice3Omurice4
3.  Add in the 2 Tbsp. of ketchup and mix well.  Pour rice into the skillet and mix well until rice is evenly coated with the ketchup mixture.  *If you like it spicy add in a couple dashes of Tabasco*  

4.  Cook until mixture is evenly heated and remove from heat.  *You can eat the ketchup rice just like this or you can wrap it in an omelet*

Omurice5
Omelet
1.  Crack eggs into a bowl and add in milk.  Quickly beat the eggs with a fork.  *I typically use 1.5 -2 eggs per omelet*

2.  Preheat a small skillet and spray with cooking spray.  Pour egg mixture into hot pan and quickly push eggs around in the pan for 30 seconds.

Omurice6
3.  Run chopsticks around the perimeter of the pan and swirl egg mixture to spread evenly throughout the pan.  Repeat as many times as necessary.  Once egg is 90% set, spoon the ketchup rice down the middle of the omelet. 
Omurice7
4.  Flip one side of the omelet over the ketchup rice and roll the omelet onto the plate.  With a paper towel quickly shape the omelet (tuck edges under so it is nicely rolled around the ketchup rice). 

5.  Drizzle with ketchup or Siracha!
omurice10

Technorati Tags: ,,

Friday, March 18, 2011

Chocolate Mochi

Mmm Chocolate Mochi, the last recipe from our Japanese Feast meal.  This is like the combination of a brownie and mochi...  It's so good warm out of the oven, I even like it cold out of the fridge.  Any excuse to eat it is actually good...

On another note, Lindselicious is now on Facebook!  Be sure to click on the icon on the right so you can "become a fan". 

Chocolate Mochi
recipe from LT's mom

2 cups mochiko
2 cups sugar
1 Tbsp baking soda
1.5 cup melted butter (we just used 3/4 cup)
1 cup semisweet chocolate chips
2 cans (12 oz) evaporated milk
2 beaten eggs
2 tsp vanilla extract

1.  Sift mochiko, baking soda and sugar in a bowl.
2.  In a medium saucepan melt butter, chocolate chips and combine with evaporated milk, vanilla extract and slowly mix in the beaten eggs.


Sorry took the picture mixing on the stove, didn't actually heat the bowl!
3.  Mix and stir into dry ingredients till smooth.
4.  Pour into a greased 9x13 pan and bake at 350 degrees for 45-55 minutes.  *Test for cake like texture and bake until the knife comes out smoothly*.  Cut with a plastic knife and serve. 

Thanks LT!  You are welcome to come over and cook anytime!  :)  Actually next time I'll probably have to cook up a good meal for him and the Brazilian...  Perhaps next we'll do an Argentinean feast or sushi!

Sunday, March 13, 2011

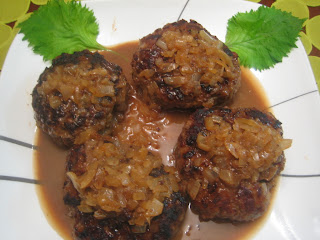
Hamburg Steak, a Japanese Feast!

My heart goes out to everyones family and friends in Japan that were impacted by the Earthquake this past week.  Things like this really make you appreciate the small things in life, as well as our friends and family!  One thing that I love about Japanese culture is their never ending fighting spirit and their strength to get through whatever life hands them.  These concepts are called chikara (inner strength) and gamman suru (to endure).  Our friends in Japan have a long road ahead of them, and while I'm certain that their fighting spirit will help them get through the tough days ahead, there are so many ways that we can help as well.  Global Giving, the Red Cross and countless other organizations are providing easy ways for us to reach out a friendly hand.  On that note, what better than a Japanese Feast to inspire us to help out our friends in Japan, and remind us how fortunate we are in our daily lives.

In Japanese cuisine they have many "Western" dishes, known as yoshoku.  Over the years these dishes have become classic comfort foods in many Japanese homes and restaurants.  Often referred to as Hamburg or Hambagaa, this dish is a Japanese spin on the classic Salisbury Steak/meatloaf with gravy.  There are many variations and sauces that are popular in Japan.  My friend LT came over and we made one with onion gravy and some grated daikon and ponzu!  
Hello Kitty loves this meal!
Hamburg Steak
adapted from my friend LT


1 lb ground beef (or mixture of beef and pork)
1/2 cup panko (japanese bread crumbs)
4 Tbsp milk
1 egg
1 small onion, diced
olive oil
1/2 tsp salt
pinch of nutmeg


Onion Gravy
1/3rd of the cooked onion (from above)
1 1/2 Tbsp soy sayce
1 Tbsp mirin
1 clove garlic, grated
1 1/2 Tbsp butter
1/4 cup water

1.  Heat olive oil in a large sauce pan on high heat.  Add in minced onions and cook for 2-3 minutes, reduce to medium and cook for another 5-6 minutes.  Once the onions are slightly brown, set aside and remove from heat.  *It is important to let the onions cool, if you combine with the meat while they are still hot it will change the texture of the patty*

2.  Knead meat with salt, pepper and nutmeg until it reaches a sticky texture.  In a separate bowl add milk and panko together.  Once combined add in panko mixture, 2/3 of the cooked onion mixture and the egg. 

3.  Divide meat into 4-5 sections and rub olive oil on your hands.  Shape meat into a ball, tossing from hand to hand to remove air from mixture.  Shape the ball into an oval and indent the center before placing into a hot pan with olive oil.  *This allows for a faster cooking time and ensures that the meat cooks evenly*

4.  Fry till golden on both sides and add 1/2 cup water to pan.  Cover the pan and allow the mixture to steam and cook until majority of the water is evaporated.  *If your lid doesn't have a hole for the steam to escape, leave the lid slightly ajar or use a piece of foil over the pan. *  Remove hamburg from pan.

Making the Gravy

1.  Using the pan that you just cooked the hamburg in, add water, soy sauce, mirin and already cooked onion.  Cook until the gravy comes to a slight boil.  Add in butter and grated garlic.  Cook until butter is completely melted, stirring occasionally. 

2.  Spoon gravy over the hamburg steak.

This great as is and goes well with hot steamed rice and some steamed veggies.  Other additional toppings to your hamburg steak are grated daikon and ponzu sauce (Japanese citrus based sauce). Personally I love it with the ponzu and grated daikon!


LT and I ate this with some steamed rice (brown and white mixture), spinach and a yummy tomato ginger salad.  Then to top off our Japanese feast we also had some yummy chocolate mochi that we baked up as well.  I'll post the tomato ginger salad and the chocolate mochi recipes later this week!

Wednesday, March 2, 2011

Chi Chi Dango for Hinamatsuri

Girl's Day, or Hinamatsuri is a Japanese Doll Festival held on March 3rd.  Growing up in Hawaii, Girl's Day was a fun time in which the boys were super nice to us!  In grade school, teachers often asked the boys to pick up our lunch, pull out our chairs before we sat down and other cute gestures like that.  Best of all, on Girl's Day we often had Mochi treats, rice crackers that looked like kokeshi dolls and if you were lucky you might even get a Japanese doll!  My mom would often send me to school with a tray of pink and white colored chi chi dango to share with my classmates. 


Chi Chi Dango
recipe from my mom

1 box mochiko (3.5c)
2 c sugar
1 tsp baking powder
1 can coconut milk
2 c water
1 tsp vanilla
1/4 tsp food coloring

1.  Combine mochiko, sugar and baking powder in a bowl.
2.  Blend Coconut milk, water, vanilla and food coloring in a separate bowl. Add wet ingredients to mochiko mixture.
3.  Grease and flour a 9x13 pan. Pour into pan and cover with foil and bake at 350 for 1 hour.
4.  Let cool and cut with plastic knife (or cut out with cute cookie cutter shapes) and roll in mochiko or kinako.
This is a super easy recipe if you are just starting out with mochi!  There are tons of variations varying from butter mochi, blueberry, chocolate or pumpkin mochi and mochi stuffed with truffles, peanut butter, or an (bean paste).  Even if you aren't Japanese, this is a super cute way to celebrate being a girl with your daughter, sister or girl friends!

Friday, January 14, 2011

Ramen Eggs (Ni Tamago)

Hello, welcome to my blog!  After a couple of years of reading and trying recipes from healthy eating and dessert blogs, perusing Tastespotting daily - I was inspired to start my own blog.  In the last year I started working out with a trainer and eating healthier and this year he amped it up by asking me to keep a food diary.  :(  (No cheating allowed!)  Last year was also a super busy one at work and as part of my stress release I found myself baking up treats almost every Sunday to bring into work.  This year I hope to eat healthier by finding new healthy food combos I love; as well as lightening up caloric favorites.  And we do all this so we CAN eat the crazy delish desserts and treats! 

To kick it off I'll start with an easy and simple recipe, that is soo good and can kick a lot of dishes up a notch.  Yes, I'm talking Ramen Eggs!!  Otherwise known as Shoyu Tamago no Zensai or Ni Tamago.  These are the yummy seasoned eggs often found in your hot bowl of Ramen.  Recently I've added them to Bento lunches, on salads and I bet they would be great with noodles or hot rice dishes as well. 


Ni Tamago in Ramen!!
This recipe comes from "Harumi's Japanese Cooking" by Harumi Kurihara (Japan's Martha Stewart), a wonderful Christmas gift from my friend LT. 

Shoyu Tamago no Zensai

6-8 Small hard cooked eggs (See how to get the perfect yolky egg below)
1 tablespoon rice vinegar
2 tablespoon soy sauce
1 teaspoon superfine sugar

Shell the eggs.  Mix the vinegar, soy sauce, and sugar together, making sure the sugar dissolves.  Put the eggs with the marinade into a large plastic bag.  Leave to marinate for 2-3 hours, moving the eggs around in the bag to ensure even coloring.  (If you don't part of the egg will stain darker and the other side of your egg will be sad).  Note:  I actually let my eggs sit over night and they turned out fine.  In the morning I simply removed from the marinade and placed them in a container. 

How to Cook the Egg
I like my eggs to be a little yolky (that bright yellow color).  To achieve this start with room temperature eggs and fill a pot with enough water so that the water level is at least 1/2 inches above the eggs.  Bring the pot of water to a gentle boil and carefully place room temperature eggs into the water.  Quickly reduce heat to a low simmer and cover pot with lid.  For a soft boiled egg cook for 6 minutes, for a more well cook egg leave covered for 7-8 minutes.  Place cooked eggs in cold water or an ice bath to stop the cooking process.

Super yummy!  Add in your Ramen or eat alone as a snack tonight!

Mmm in my Bento! I used my heart egg shaper mold for these...